
8 Lighting and Rendering Tips
Written by Marechal Laurent - 28 september 2018
Classified in : Blender, Links - Tags : none
Site d'origine : https://cgaxis.com/8-lighting-and-rendering-tips/
Today I would like you to show you 8 lighting and rendering tips useful in 3d work.
I mainly use 3ds max but all of these rendering tips are for any 3d graphic software available on the market. I hope you find them useful and you will apply some in your future projects.
Linear Workflow and Gamma 2.2
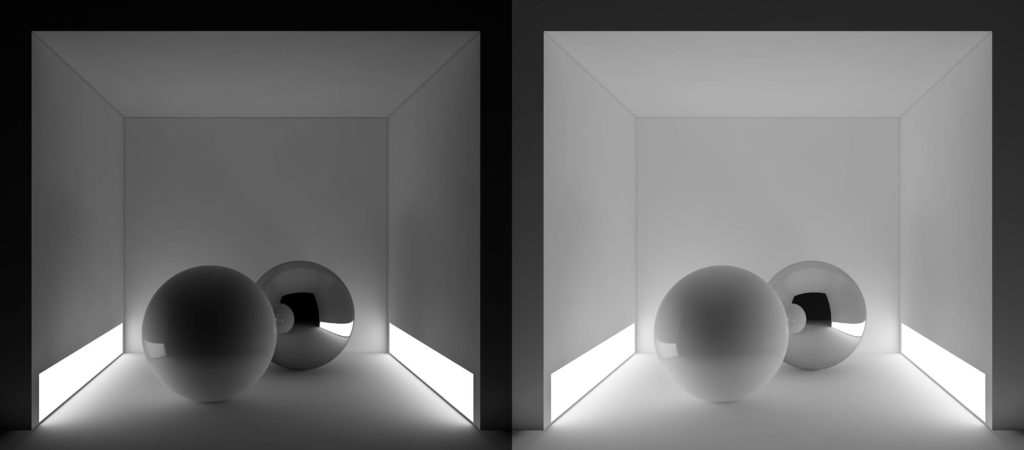
I think everyone has heard about the linear workflow. But if you’re new to creating 3d renderings, I’d like to introduce you to it first. This is a way of rendering where images are “mathematically” correct. It is also connected with gamma which is processed by 3d application and with gamma which your monitor can display.
Monitors usually have a gamma 2.2 but 3d softwares process the data in gamma 1.0. Because of that your image may appear too dark, if it really is not. So in the case of using a standard workflow with standard gamma, it may happen that you will increase the intensity of lights or GI when it really will not be necessary. It is essential to set your application so it can use gamma 2.2. In newer versions of 3ds max this setting is a default value but you can check it by going to Preferences > Gamma and LUT.
Image References
I think it will be important if you start collecting references images when preparing for the project. Search the internet for photos of similar scenes to the one you want to make. You can also take a look at the work of other artists. Look carefully at the pictures and renders which you have chosen.
Pay attention to how the light is distributed, which places are more illuminated and which are shaded. Also, try to assess how the external environment affects the scene. Look at all the small details too. These details will increase the natural appearance of your scene.
Natural Materials
Another of the rendering tips is to use the most natural materials. Especially their diffuse color. It is a frequent error that the materials created by some 3d artists are oversaturated. As a result, the final appearance of the scene may not be natural. Your project may look not photorealistic and too “cartoonish” because of thems.
The same is true for black and white materials. In the real life you will never find things that are completely black or completely white. So try not to use materials that have a value of 0, 0, 0 or 255, 255, 255.
Lighting in Parts
Often, when preparing a scene for the final image, it will not only consist of one room. It may happen that the camera is in the corridor or in the place where the door is open to another room. In this situation, to create a more interesting scene you can use different lighting methods for seperate rooms. Of course, you can not exaggerate and illuminate them completely in a different way.
One of the rooms you can show, for example, a completely natural light, such as sun light. The second one can be a little more obscure – with, for example, smaller windows and illuminated by artificial light – a floor lamp or wall lamp. You can also use a creative way of illumination, for example a decorative lamp that will give light in a more vivid color, or LED strips placed in interesting places.
Light distribution
The proper arrangement of lights is essential for natural renders. There are many ways to get the right effect. Different parameters and settings must be used in the cloudy noon and different in the sunny evening.
You can also take a look at method used both in 3d rendering and in films or photography. It is called three point lighting and has been used for a very long time in many industries.
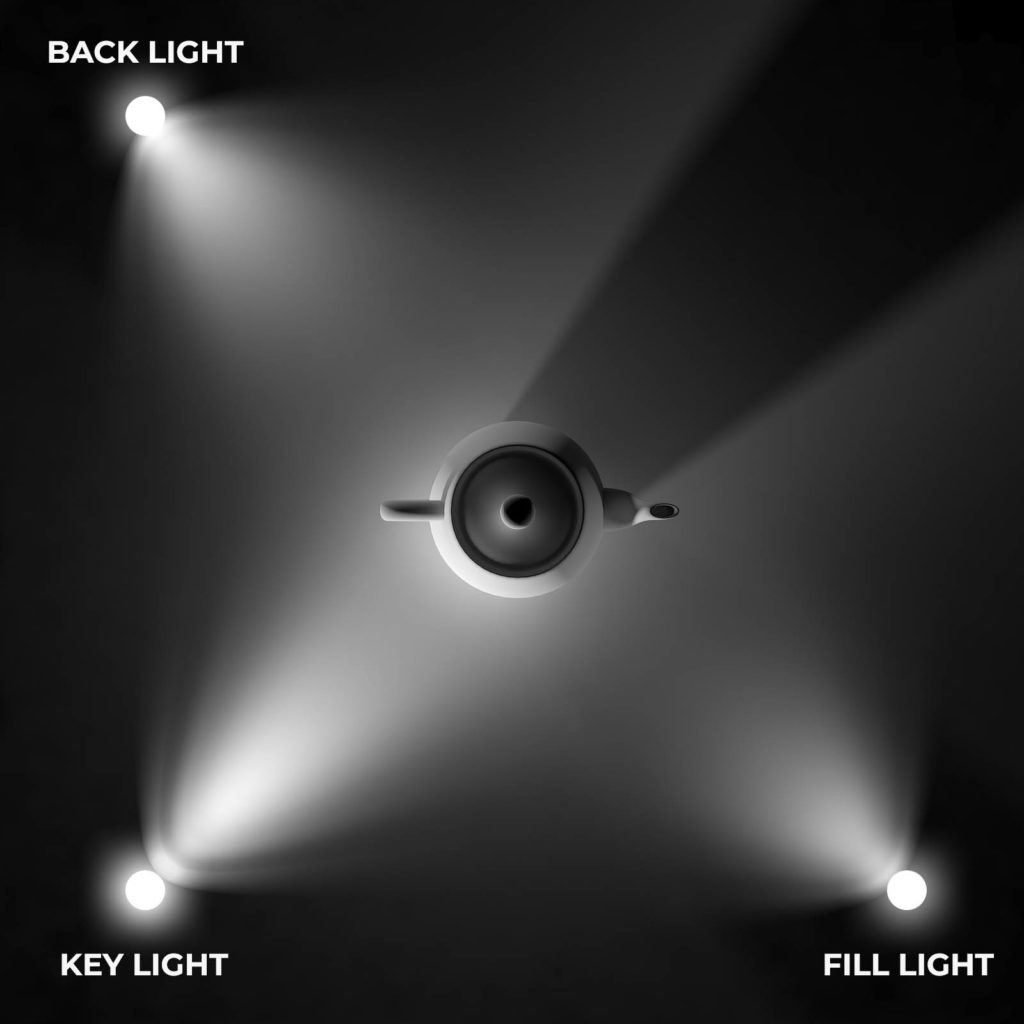
It involves the use of three main lights: key light, fill light and back light. Key light is the main light that illuminates the scene or object you want to present. It can be sunlight or other strong light. It is important that it be the strongest of these three lights. Fill Light is the light that illuminates the dark areas of your scene. It should be weaker than key light and a little more scattered. This light you should put at an angle of about 90 degrees relative to the key light. The third light, back light, will help you get a greater depth of the subject or scene. It should be at the back or 90 degrees from the key light, but in the opposite direction as the fill light.
In the case of placing lights in the scene, it is worth checking the setting of each light. I mean, to test each one separately and see how it affects the scene and the objects. On the render with all the lights turned on you will not always be able to see all the details and shadows that each of them creates. So do test renders with only one light turned on, so you’ll be able to eliminate all lighting errors.
Render Passes
Use render passes in each of your final renders. If I would explain what these passes are, they are like layers that compose the final appearance of the image. Rendered separately reflections, refractions, global illumination, z-depth and, above all, alpha, will allow you with much greater ease of composing the final image in the photo editing software. Even if you think you do not need them, sometimes it’s worth using them anyway, because maybe you want to change some value in your render, and without the appropriate render pass you will have to render whole scene again.
IES Lights
IES stands for Illuminating Engineering Society. The IES standard has been created to transfer photometric data via the Internet with greater ease. In 3D graphics, the IES light can generate beautifully looking light profiles. They work great for internal scenes, where you want to use different types of halogen or other artificial lights.
Nowadays it is very easy, because probably all new rendering engines have the ability to load IES profiles so their lights. Standard in 3ds max is Photometric Target Light and in V-Ray VRayIES. You just need to just load the appropriate light profile and set its intensity.
IES profiles can be found on many websites on the internet or you can make them yourself using the appropriate software, such as the tool available on the Vertheim website: https://www.vertheim.com/ies-generator.html
Composition
The last thing I want to mention is image composition. As in photography, it is of great importance in 3D graphics. And the render image is nothing more than digitally created photography. Try to experiment with different types of cameras and set it up under different angles. You can also read a few rules that work in photography, such as Rule of Thirds, Golden Ratio or Grid Theory.
Comments are closed.