
The Secret Ingredient to Photorealism
Written by Laurent Marechal - 17 february 2017
Classified in : Blender, Links - Tags : none
Site d'origine : http://www.blenderguru.com/tutorials/secret-ingredient-photorealism/
Yes, it turns out there really is a “secret ingredient” that currently only a small portion of the blender community are using.
You may have already watched Photorealism Explained which explains the fundamentals steps of photorealism. But this video is about something new: Dynamic Range.
You may not know what it is or how it affects your render, but it’s actually the reason that some renders still look distinctly fake despite having proper modelling and materials. Not only that but it’s also been causing you to make lighting “cheats” to make your scene work.


To talk about photorealism you need to talk cameras. And in this case, specifically how camera’s see light.
You can’t take a photo with a camera and expose for both light and dark areas. Instead you pick one of them as the “exposure point”, and adjust the aperture, shutter speed and ISO of the camera until that point sits at “middle grey“.
This is why if you take a photo of someone and they look dark, then instead choose their face as the exposure point, the background becomes too bright.
Either you expose for the background and make the foreground dark, or expose for the foreground and make the background too bright.
The camera can see areas outside of “middle grey”, but only to a certain point.

The amount that it can see on either side is called the Dynamic Range of the camera. The more range, the better the image.
Different cameras have different amounts of dynamic range, but the best is actually our eyesight seeing at an estimated 15-20 f-Stops.

Unfortunately the worst is Blender, seeing just 8 Stops by default… but thankfully you can fix this!
How Dynamic Range affects your renders
Imagine you wanted to recreate the scene below in Blender:

You modelled the scene, did the materials. And then for the lighting you followed the reference: one sunlamp. You adjust the sunlight energy until it looks bright enough, then render to see this:

When you compare it to the reference photo you can see that our render is significantly darker than the reference photo.
At this point most of us would start doing some “cheating”. Like adding extra lamps to exaggerate bounce lighting, or increasing the sky light to fill the room with light.
But this makes no sense.
In the reference photo, the room is lit with the sunlight only. No cheats required. So why doesn’t this work in blender?
It doesn’t work due to the poor dynamic range:
- The reason the room is too dark is because the sunlight isn’t bouncing enough,
- The reason the sunlight isn’t bouncing enough is because the sunlight isn’t bright enough,
- The reason the sunlight isn’t bouncing enough is because the sunlight was already blowing out
- The reason the sunlight was blowing out was because of having only 8 stops of dynamic range to work with!
So if you can increase the dynamic range, you can increase the sunlight, which will increase the bounce lighting, which will give us perfect lighting without any workarounds!
The Cause of the Poor Dynamic Range
Thankfully Blender’s poor dynamic range isn’t due to the actual renderer. And for that matter, many external renderers suffer from the same problem.
The cause is the Color Management configuration that Blender is using.
Because just like a camera, when blender renders something it’s storing the information of the final render as 0s and 1s. In order to see the information on a display, it needs to be converted. And for that it uses a color transform.
But the problem is that blender is using the sRGB color transform! Which was originally designed to approximate the response of a CRT monitor. It was never designed for rendering, nor should it ever be used for rendering!

The solution: Filmic Blender
The solution is to change the Color Transform from sRGB to the custom color configuration called “Filmic Blender“.
Filmic Blender was created by Troy Sobotka, an industry professional and camera enthusiast who saw the problem in Blender and wanted to fix it. So he coded Filmic Blender – a similar color management configuration to ACES, which is the industry standard for VFX.
Filmic Blender allows you to go from 8 stops of dynamic range, to a massive 25 STOPS!

It’s actually even better than it sounds, since each f-Stop increase is a doubling of light. So it’s kinda like going from a 256 crayon set, to a 33,554,432 crayon set :P
This gives you a massive amount of extra light information to play with.
So you can now increase your lighting to the values that it should be (in this I made the sunlamp 130, instead of just 20)!

Best of all Filmic Blender is free. I’d gladly have paid $200 for it, but Troy wants to help the community, so he’s graciously made it free.
Even Better: Exposure Desaturation
Besides giving you 25 stops of dynamic range, Filmic Blender also does something else: it gives you accurate exposure desaturation.
This is to imitate an effect that’s unique to film: as exposure increases, colors will become more and more desaturated.

Photo by haco-otoko. Notice how the colors desaturate with exposure?
While you could call this “technical limitation” it’s actually very pleasing to the eye. To the point that many camera manufacturers have built desaturation into the firmware to bring this effect to the digital format.
You don’t need to do anything to see this, just use Filmic Blender and it will happen automatically :)

Installing Filmic Blender
- Download Filmic Blender (click Clone or Download > ZIP)
- Unzip it to datafiles folder of Blender (for Windows users this will be: C:\Program Files\Blender Foundation\Blender\2.xx\datafiles)
- Rename the existing ‘colormanagement’ folder to ‘colormanagement_oldbackup’
- Rename the newly unzipped folder to ‘colormanagement’
- Ensure that when you open colormanagement you’re able to see the looks & luts folders inside (so they’re not inside another subfolder)
- Open Blender and you should be able to see these results in the Color Management Panel:
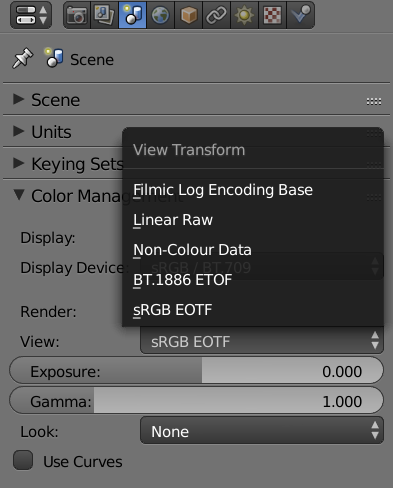
Using Filmic Blender
- Set the Render View to Filmic Log Encoding Base
- Set the Look to Base Contrast (or low/high depending on what the scene requires. It’s personal preference).
- Enjoy higher dynamic range!
Pro-Tips for Filmic Blender
Tip #1: Use of the “False Color” Look to see a visualization of the exposure in your scene.

No more guessing whether or not the values are clipping! The colors tell you that:
- Black: Low Clip
- Purple: -10 EV
- Blue: -7 EV
- Cyan: -4 EV
- Green: -2 EV
- Grey: 0 EV
- Green: +2 EV
- Yellow: +4 EV
- Red: +5.5 EV
- White: High Clip
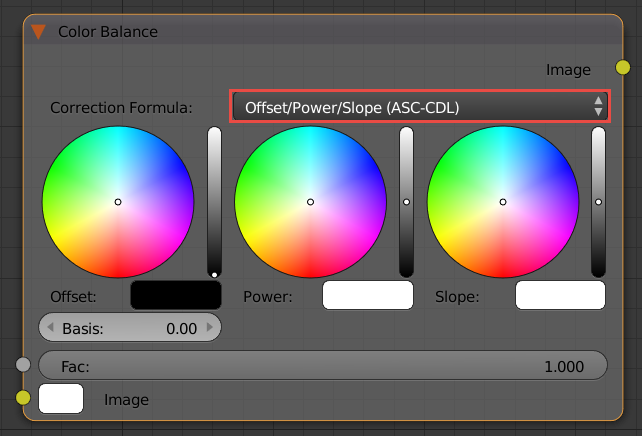
Tip #2: Forget the ‘Creative Looks’ that you once had in the color management section. They shouldn’t have been used anyway, as they were mangling your color data.

Instead use the color balance node, set to Offset/Power/Slope. The other formula (Lift/Gamma/Gain), shouldn’t be used (ever) as it’s based on the display referred workflow and will therefore mangle your color data:
Tip #3: To keep your color information intact, do not use the Mix Modes: Multiply, Screen, Overlay, Darken, Lighten, Overlay, Dodge, Burn, HardLight, SoftLight or Difference.
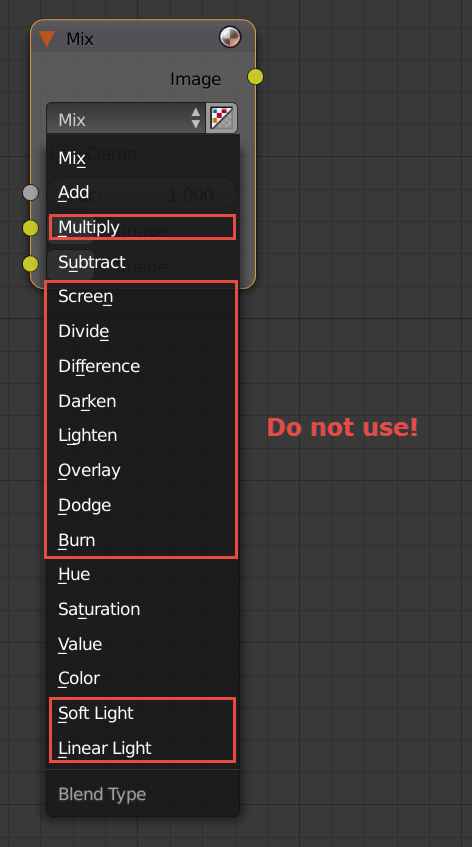
“WHAATT?! Why?”
Because they too are based on the old display referred workflow, not the scene referred workflow that blender is using. Therefore, if you use them you are mangling your color data.

So that’s Filmic Blender! I’m going to be using it for all my tutorials in the foreseeable future. So make sure you install it! :P
If you enjoyed the tutorial, please share it with someone else in the community and like the youtube video. Hopefully with enough exposure a change can be made!
Comments are closed.