
Mira Tools
Written by Marechal Laurent - 25 september 2019
Classified in : Blender, Links - Tags : none
Site d'origine : https://github.com/mifth/mifthtools/wiki/Mira-Tools

Mira Tools are modern modeling and retopology tools. This is a set of tools dedicated to my daughter. I love you Mira!
There are some Modeling and Retopology Tools which were written since Mira's born. Some of them were taken from blender like CurveStretch(GStretch) and CurveSurfaces(BSurfaces). But DrawExtrude, LinearDeformer and CurveGuide tools were taken from Lightwave and Modo.
BlenderArtists Thread: http://blenderartists.org/forum/showthread.php?366107-MiraTools
[ ] [
] [ ] [
] [ ] [
] [ ] [
] [ ] [
] [ ]
]
MiraTools tab is located in T-Panel. https://www.youtube.com/watch?v=_toe-7vlxb8
You can change inputs Blender and Maya.

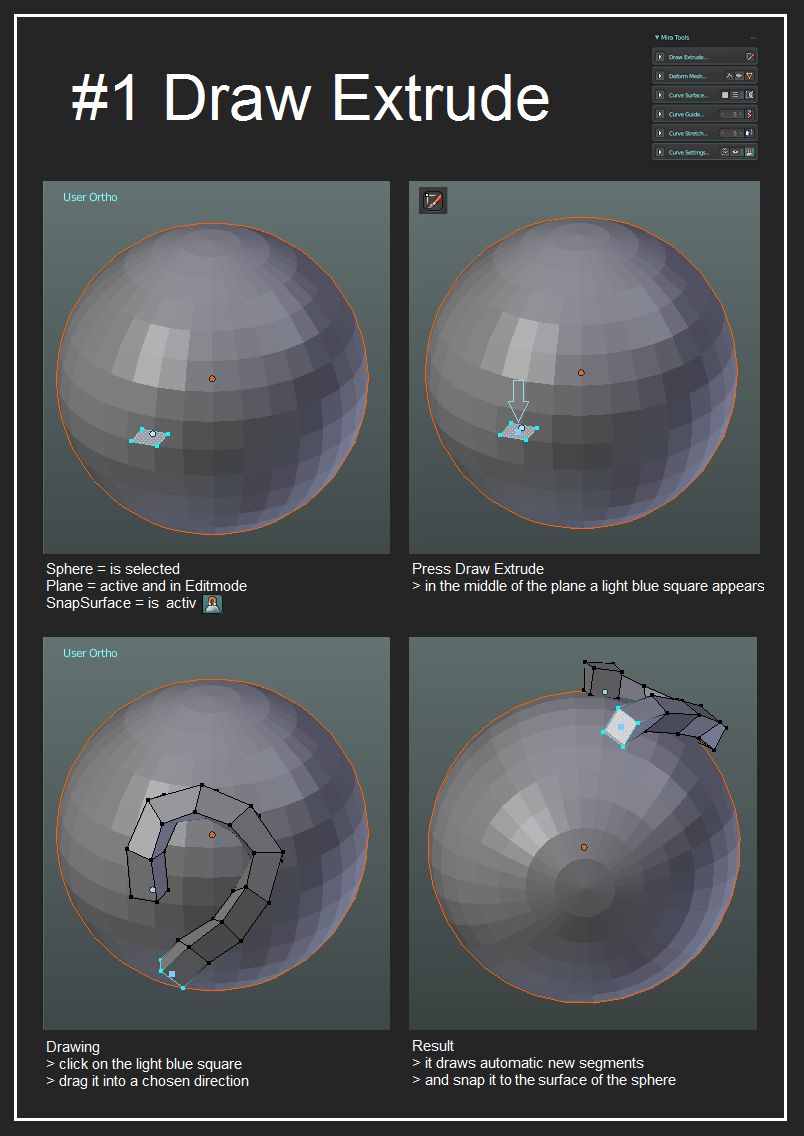
This tool allows a user to draw extrudes. Inspiration of this tool was taken from Modo tools.
When a user enables the tool - a blue point will appear at the center of selection. A user should drag this blue point to get more extrudes.
There are 2 main purposes for the tool:
- Draw extruded geometry on a surface. To draw on a surface you need to enable "SurfaceSnapping" checkbox at the tools settings.
- Draw extruded geometry on a screen.

The most important thing in DrawExtrude is first extrude direction. If a user does the first extrude in correct direction then all other extrudes will be correct too. Here is example of first extrudes:

Important Shortcuts:
- S - Scale extrude point
- Shift+S - Scale all extrude points
- R - Rotate extrude point
- Shift+R - Rotate all extrude points
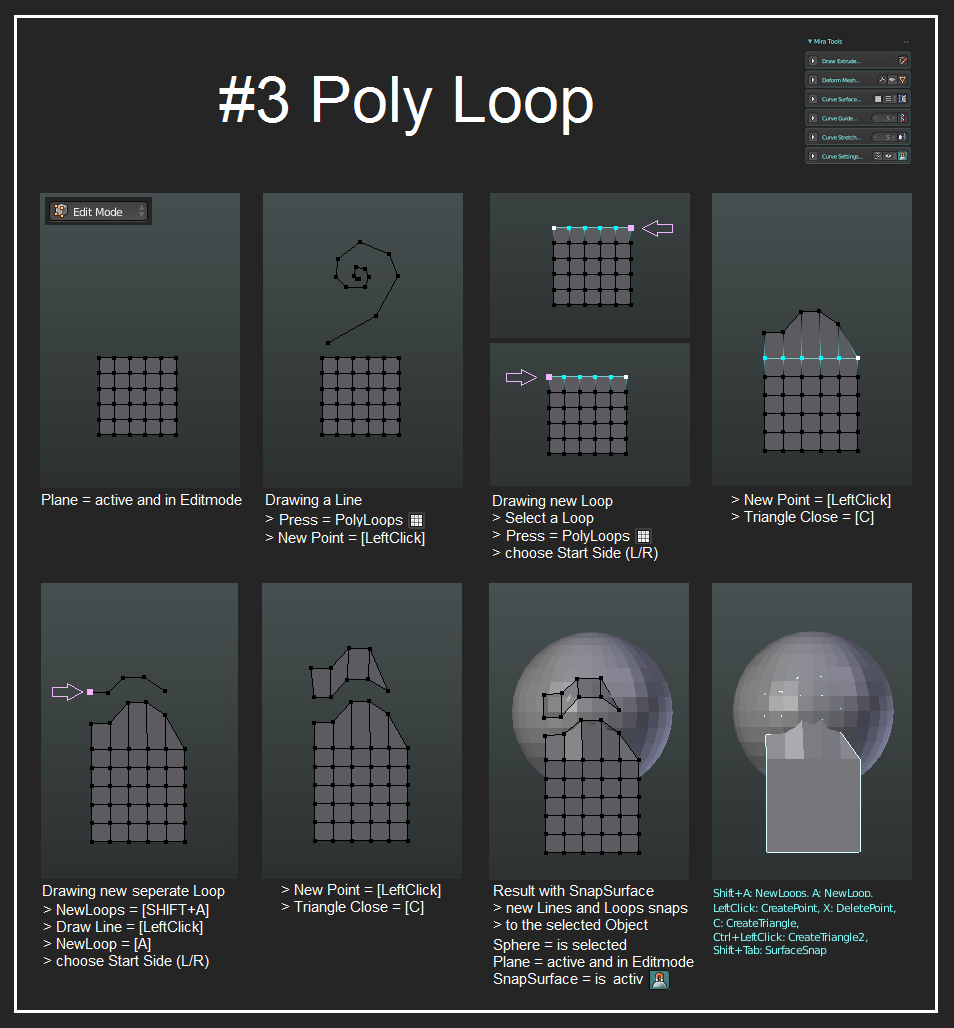
This tool was designed to make hard surface retopology mostly. That was his primary goal. But you can use it for modeling too. To use it firstly a user should decide will he use either Loop-selection or without any selection. As the tool can work with a selected loop and extend existing surface.
To draw on other surface you need to switch "SurfaceSnapping" checkbox on.
Some examples of usage:


Important Shortcuts:
- A - add new loop to a surface
- Shift+A - add entire new polyloop surface
- Ctrl+Click - ad triangle
- C - add new triange for the last vert
- X - delete previous vert
- Shift+Tab - switch SurfaceSnapping Mode
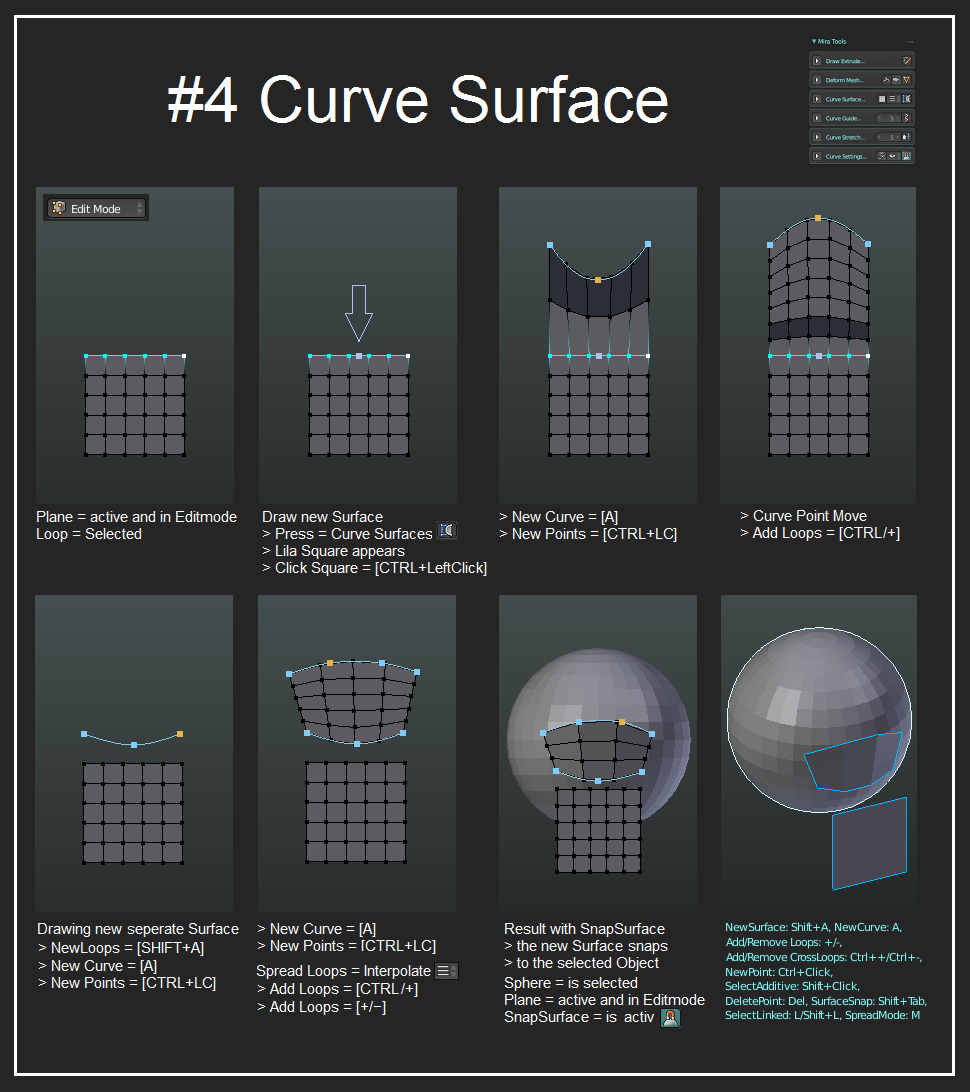
CurveSurfaces is some kind of remake of Blender's BSurfaces tool. It allows a user create surfaces using curves as guides. This tool is very handy for retopology.
This tool also works with existing selected loops. Just like BSurfaces tool. To pick a loop a user should select a purple point at the center of the loop when the tool is active. Then a user should use "A" key to add new curves to the loops. Here is explanation screenshot:


There are 2 different modes which can help in some areas - OnCurve Mode and Interpolation Mode. Here are some examples of using OnCurve mode and Interpolation mode:


Important Shortcuts:
- A - add a new curve to a surface
- Shift+A - add an entire new surface
- +/- - add/remove horizontal loops
- Ctrl++/Ctrl+- - add/remove vertical loops (only for Interpolation mode)
- Shift+Tab - switch SurfaceSnapping Mode
- M - change interpolation along the curve
- Shift+Click - select additive points
- Ctrl+Click - add a point to a curve
- L/Shift+L - select all points of the curve.
- Delete - delete selected points
This tool allows a user to deform a mesh using noise. It deforms it along point normal. Pretty handy tool when a user needs some noise.
Some examples:


This tool allows to make basic deformations like bend/twist/tape. Pretty handy for modeling.
Here some examples:

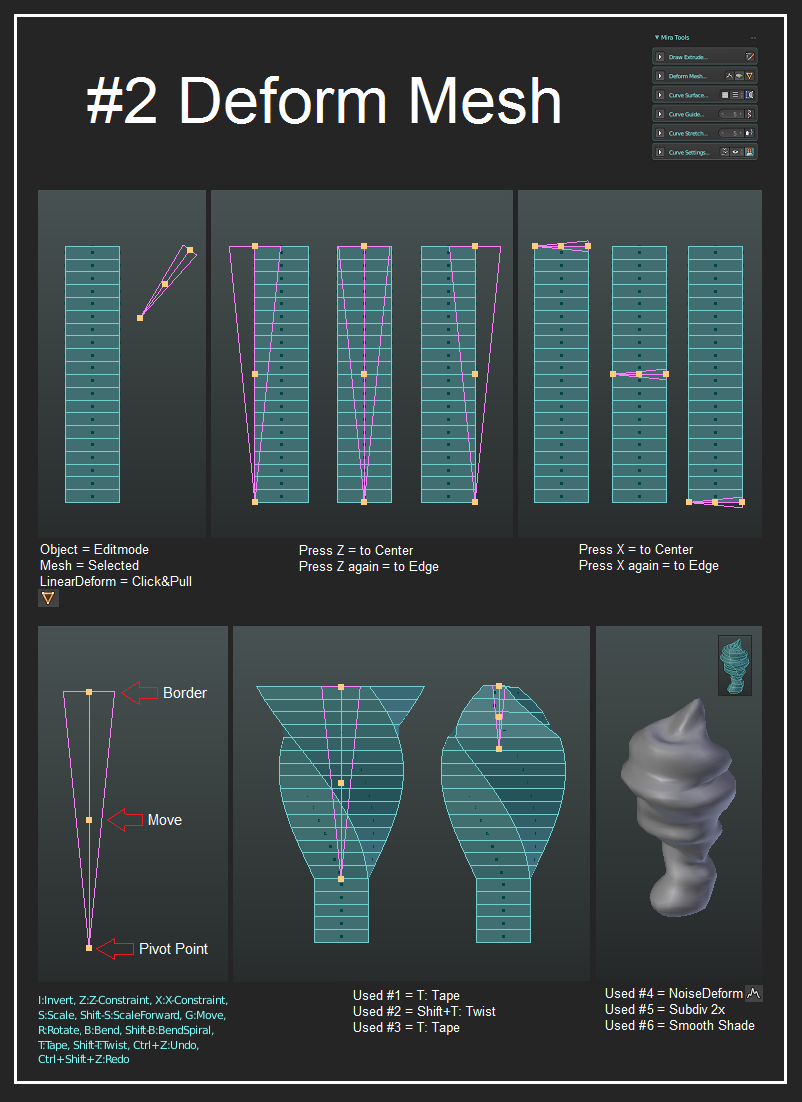
This tool is more advanced than the Deferomer Tool. It allows a user deform a mesh in many different ways. This tool was inspired by Lightwave and Modo Falloff Tools.
A user should activate the tool and draw the falloff. Then a user should apply deformations. Also, the LinearDeformer has history support (Ctrl+Z/Ctrl+Shift+Z) and axys constraints (X and Z keys) which make it very powerful.
Some examples of the tool:

Important Shortcuts:
- X/Z - axys constraints
- Ctrl+Z/Ctrl+Shift+Z - undo/redo
- B - bend
- Shift+B - Spiral
- G - move
- S - scale
- Shift+S - scale forward
- T - tape
- Shift+T - twist
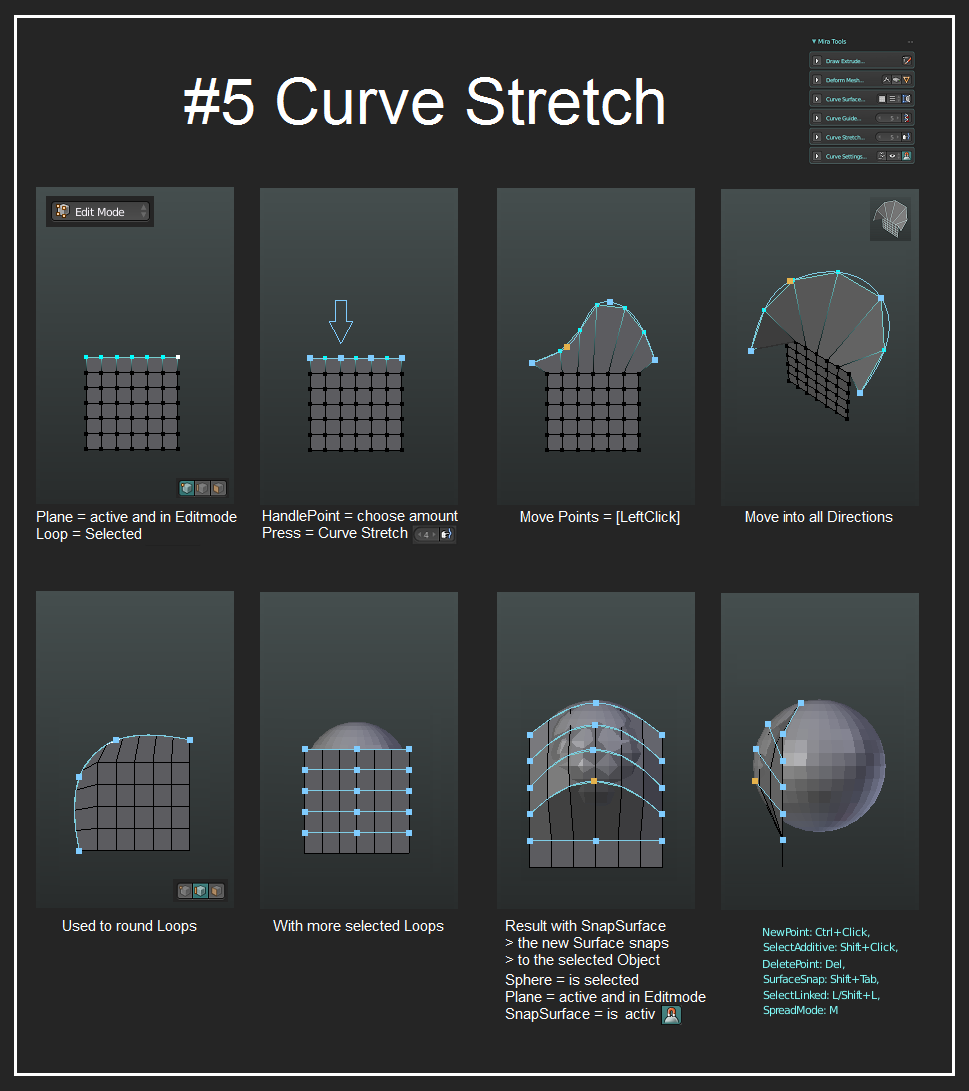
Curve Stretch Tool is a remake of Blender's GStretch tool which was included into LoopTools set. It allows to edit selected loops with curves. To use it a user should select some edge loops and enable the tool.
The tool also has SurfaceSnapping feature. A user should enable "SurfaceSnapping" checkbox.
Usage example:

Important Shortcuts:
- Shift+Click - select additive points
- Ctrl+Click - add a point to a curve
- L/Shift+L - select all points of the curve.
- Delete - delete selected points
- M - change spread mode of curves
- Shift+Tab - enable/disable surface snapping
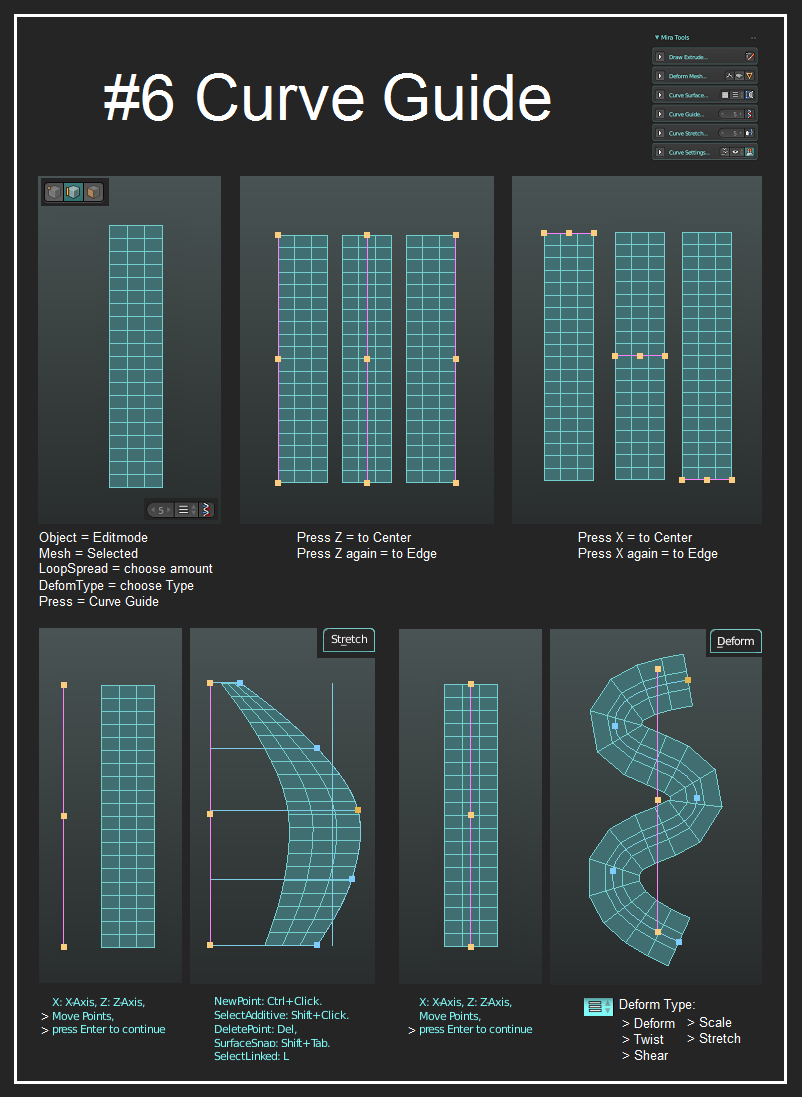
The Curve Guide tool is a tool for deformations with the greatest help of a curve. This tool is a remake of Spline Guide tool from Lightwave which is very powerful.
When the tool is enabled a user will see a line with 3 control points. A user should set the line properly to fit deformation direction. Then a user must press "Enter" key to apply direction and curve will appear.
There are some deformation modes which a user can select:
- Stretch
- Scale
- Shear
- Twist
- Deform
Here is an example when a user set the line and presses "Enter" key to activate the curve and the deformation:

Deform mode works a bit different but it allows a user to deform geometry directly in the 3d space. This mode is not perfect and Deform mode has not perfect math. It's recommended to deform only low-polygonal meshes. But it helps in many situations during modeling.
Here is a simple example of the Deform mode:

Also, it's recommended to use "I" key for the Deform mode as it inverts meshes sometimes. "I" key helps to invert the mesh back.
Important Shortcuts:
- Enter - activate a curve and deformations
- Shift+Click - select additive points
- Ctrl+Click - add a point to a curve
- Delete - delete selected points
- M - change spread mode of curves
- Shift+Tab - enable/disable surface snapping (For Deform mode only)
Comments are closed.